Thursday, February 19, 2009

Basketball Photography

18-200 mm lens set to 18 mm, 1/80 sec at f/3.5, ISO 250

It's basketball season so I've spent the last couple of months attending my son's basketball games and trying to figure out how those amazing Sports Illustrated photogs ply their craft. Taking photos of fast-moving action in poorly lit gyms is a definite challenge and does require some specialized equipment. Here's how I did it on a shoestring budget. First of all, I'm a huge fan of David Hobby and his Strobist site. His site is my number one source of information for "off camera" lighting. Over the past year I've purchased two used Nikon speedlights (SB-24 & SB-28) from eBay and a Cactus V2 wireless transmitter and two receivers. I also use lots of gaffers tape and bongo ties. The biggest challenge that I've found is getting enough light on the subject so that I can use a reasonably low ISO with a fast enough shutter speed to stop the action.

The setup:
I like to use my 50 mm f/1.4 lens as it allows me to get close to the action while still using a large enough aperture to blur the background. I've also experimented with my 18-200 mm VR lens, but with less success. In order to provide adequate light I attached the radio trigger receivers to each flash and then used bongo ties to attach one speedlight to the railing of the bleachers, pointing towards the top of the key. The second flash was set up on the opposite side of the
gym in a similar position, but without a railing to fasten it to, I had to use gaffer's tape to fasten it to the wall. Not ideal but it worked. I did get some pretty funny looks from some of the parents in the crowd. Using this setup, and the radio transmitter attached to the camera I was able to get both flashes to fire simultaneously and stop the action on the floor. Even though I had the lighting pretty much sorted out didn't mean it was easy to get great shots. To get really great action shots you need to take lots of photos and spend lots of time practicing in order to get to the point where you can anticipate the action. My respect for the SI guys is huge.

Wednesday, February 11, 2009

Fast 50


My favorite lens, and one that every photographer should have in their arsenal, is a "fast 50." When I bought my digital SLR camera I said no to the temptation of an inexpensive "kit" lens and instead put the money into a 50 mm f/1.4, which cost about $400. Even if you can't afford the f/1.4, you can get a 50 mm f/1.8, which will work just fine, for $140.

Two reasons why you need a "fast 50." First, we all find ourselves in low light situations where a zoom lens, like my 18-200 mm VR f/3.5-5.6, just won't cut it. This past summer when we were in Ireland, we attended the Willie Clancy Traditional Music Festival.
During the day students attend clinics and in the evening all of the pubs fill with musicians and spectators for "sessions." In the dimly lit pubs, by cranking my ISO up to 800 and my aperture on my 50 mm lens opened up to f/ 1.4 to 2.0, I was able to capture some decent images. These photos wouldn't ever be accepted on iStock, but I'm very glad I have these images captured.

The second reason that the "fast 50" is a must have lens, is because it gives the photographer the ability to use a very shallow depth of field and throw the background into a soft creamy blur. This technique really makes the subject seperate and stand out from the background. If you don't have a "fast 50", this is the next piece of gear to add to your kit.

Monday, February 9, 2009

My Workflow


Young couple enjoying the view of Athens from the Acropolis

Back in the days of 35 mm film, my workflow consisted of clicking the shutter 36 times, removing the roll of film, sending it off to the lab for processing, and upon return, sorting the "keepers" from the "rejects." The rejects went into the garbage and the keepers were numbered and filed in a slide box. I always had intentions of entering each slide into a database, but the task was too daunting so it never happened.
My digital photography is a bit more involved. After clicking the shutter, here's what I do:
  1. When I get home from a shoot, I remove the memory card from my camera and use a card reader to move the images onto my computer. I use a card reader rather than connecting the camera directly to the computer with a USB cable because it reduces wear and tear on the camera's USB port and it doesn't drain the camera battery.
  2. The majority of my workflow is done within Adobe Photoshop Lightroom. In Lightroom I use the "Import" feature to move the RAW files from my camera's memory card to the designated folder on my computer. I still use DVD's to back-up all of my images. A DVD has a maximum capacity of 4.2 GB so I never let a folder get larger than this size. I label each folder as SKJ_DVD##. When a folder gets close to 4 GB I create a new folder. All of these folders are contained within a folder I've entitled "Image Vault."
  3. Lightroom is great because it automatically creates date specific folders within my Image Vault folders. At the time of import I also add my copyright information and if all images are of similar content, I add content keywords at the same time. Adobe has created awesome tutorials for each stage of the process from import to export.
  4. Once a batch of images are imported into Lightroom, I use the "Library" module to begin the sorting process. I scroll through each photo and use the 'x' key to flag all reject photos. I only reject photos that are totally unuseable, ie. out of focus, dramatically overexposed or under exposed. After my initial pass I delete all of the rejects...I delete them out of my Lightroom library and off my hard drive. Gone. On my second pass through the batch of images I begin to select the best photos by using the 'p' key which adds a "pick" flag. Once I've got my best images selected, I move to the "Develop"module to make image adjustments.
  5. The tools in the develop module are arranged in order from top to bottom, in the recommended order that they be used. I sometimes jump around a bit, but typically I adjust the exposure, white balance, crop if needed, and finally boost the blacks and the clarity.
  6. If I am planning on using the image for iStock, I export the image in full size format and save it in .jpg format. I then close Lightroom and open up another program, Noise Ninja. Even at ISO 100, my Nikon D80 has some noise which has caused quite a few of my images to be rejected by iStock. After using Noise Ninja, my acceptance rate has greatly improved. After the image has been processed in Noise Ninja I upload the image to the iStock website where I add keywords and categories.
  7. If the images are for a client, I use a plugin within Lightroom to upload the images to my website which is hosted by Zenfolio. I've purchased an account with Zenfolio which allows me to use my own domain name, and upload unlimited images. Zenfolio allows me to create password protected galleries which allow the client to view their images without anyone else seeing them. Zenfolio also has a shopping cart feature which allows me to sell images from my website and add a markup to the prices charged by MPix, an online lab which is affiliated with Zenfolio. I've placed many orders with MPix and have been very pleased with the results. The prices are reasonable and the quality is superb. Images are printed and back to me within two weeks. I especially like their gallery wraps which are printed on canvas.
These are the basics of my workflow. If you want more detail or have specific questions, please ask by leaving a comment below.

Sunday, February 8, 2009

Highwood High School


Back in early fall I was asked if I would be interested in taking some photos of the local high school for use on a school publication. I responded that I would be happy to do so. I got up early one chilly October morning, drove to the school and tried to find a vantage point that would yield interesting light and an uncluttered view. I dragged the garbage can that was by the front door out of the way and got ready to capture the warm morning light. I was rewarded with a beautiful, golden morning glow. I took about fifty photos from several angles and then went home to thaw out my hands and process the images.

I plan on writing a detailed post outlining my work-flow from the moment the shutter is released until the image is either uploaded to the web or made into a print, but for now, the short version. I imported the images into Adobe Photoshop Lightroom, picked the best ones and then began to make modifications to the best images. First, I cropped the image to make a panoramic view and get rid of some of the flat blue sky. Next I bumped up the saturation to make the gold highlights pop, and boosted the blacks in order to increase the contrast. I was pretty happy with the overall image, but thought that it was still a little boring. Just for fun, I decided to save the image and then open it up in Gimp. Gimp is open-source (read "free") software and is very powerful. I've never used Photoshop CS3 or CS4 so I won't wade into the Gimp vs Photoshop debate, but Gimp is a credible alternative for the times when you need to "move" pixels. Once the image was open in Gimp, I selected the flat blue sky from the original photo. Once the sky was all selected, I did an inverse selection so that everything was selected except for the sky. Next I copied and pasted the school, trees, and foreground into this photo of a dramatic sky with clouds. Lastly I made some touch-ups to ensure that the edges of the building and leaves were natural looking.

Even though I was just messing around, I really like the final composite image. This was also the image chosen by the school administration for their publication. Not bad for a morning of having fun playing around with my camera and computer. I even got a $50 coffee card for my troubles. As always, click the "Comments" link to leave your 2 cents worth. I'd be curious to hear your thoughts on the merits of Gimp and Photoshop?

Wednesday, February 4, 2009

We've Come A Long Way Brownie

Astronomical Clock (1410) Prague, Czech Republic


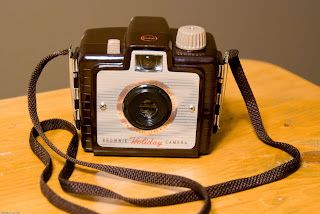
I just bought a new camera! It wasn't expensive, just 20 bucks on eBay, but to me it's a pretty special find. My new camera is exactly the same as my very first camera, the Kodak Brownie Holiday Camera, which I have referred to in earlier posts. It is pretty low-tech and doesn't have any settings, other than a winding knob and the shutter release. It consists of a brown bake-lite plastic light-proof box with a viewfinder and a shutter. I received my new camera in the mail today and was pleased to find that it is in almost mint condition. 

As I was admiring my new (vintage) camera and thinking about how much cameras have changed in recent years, I thought that I would use my new camera to demonstrate the effectiveness of the vibration reduction (VR) technology found in many new lenses. Just as a point of interest, "VR" is a Nikon term while Canon uses the "IS" (Image Stabilization) designation for their comparable technology. When I first started researching the Nikkor 18-200 mm VR lens, I was skeptical of the claims that people were making about VR lenses. Nikon claims that photographers can shoot at a full two stops slower shutter speed than with a non-VR lens. A general rule of thumb for shutter speed is that the inverse of the shutter speed should be greater than the focal length of the lens that you are shooting with. What this means in practical terms is if you are shooting at 65 mm, you should be shooting at a minimum of 1/60 th of a second in order to minimize camera shake and blur. I am absolutely amazed at the actual results of this lens. The above photo was shot hand-held at 65 mm, ISO 400, f/5.0 at 1/3rd of a second

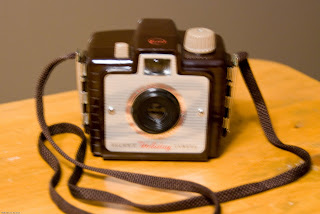
This second photo was taken with exactly the same settings, but with the VR feature turned off. Click on each image to see a larger photo. I think the results of my demonstration clearly show the effectiveness of VR technology. The top image is not exactly "tack sharp" but it is usable. The second photo is definitely a reject. 

Does VR make my tripod obsolete? Definitely not. But when I am travelling light and want to maximize mobility, VR is a credible alternative. When we were in Dublin and Dresden last summer, we saw signs in several of the old cathedrals stating that tripods were not even allowed inside. VR allowed me to capture several photos in dim light conditions that would otherwise not have been possible like image of the astronomical clock taken on a dark and drizzly day in Prague, Czech Republic last July. 

As always, I appreciate and value your comments. I'd love to read your thoughts about VR or IS technology or your memories of your first camera. 
 
Custom Search